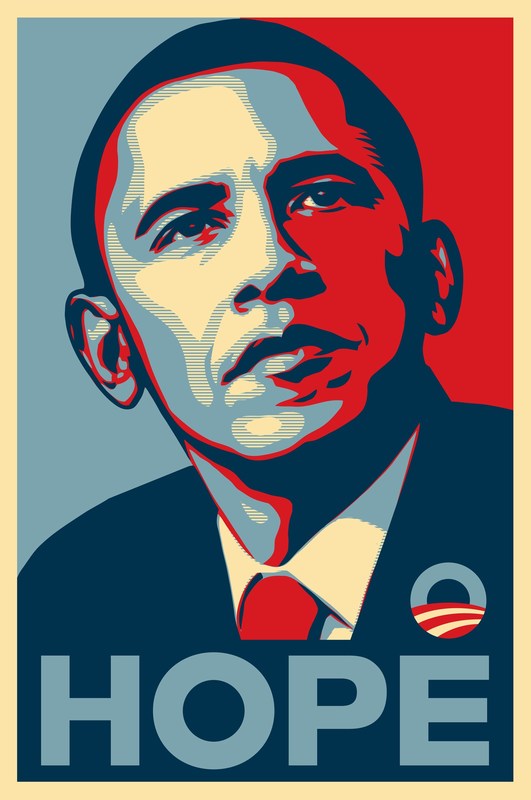
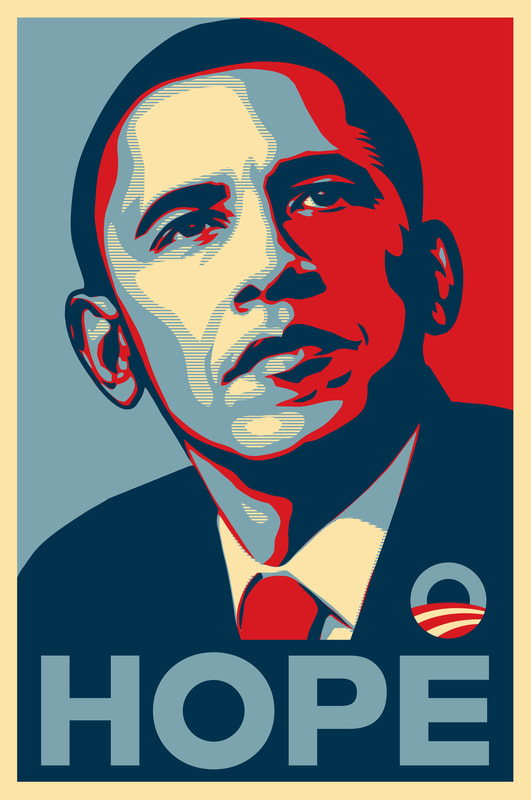
Graphic Design
  • Current Assignments
  • Course Expectations
  • Curriculum
    • Curriculum Map
  • Resources
  • Burlington High School Art & Design Program

Current Assignments

Heroes and Villains

11/29/2023

0 Comments

 
Picture
Shephard Fairey
(Desplácese hacia abajo para ver el texto en español.)
(Scroll down to see text in Spanish is at the bottom of this post.)


Chiaroscuro 
(from Italian: chiaro, “light,” and scuro, “dark”)
A technique employed to represent light and shadow as they define three-dimensional objects.


Essential Question: How do I use chiaroscuro to create form, the illusion of three dimensions on a two dimensional surface?

Content Question: What makes a hero?


Due Date:
Two weeks

Project:
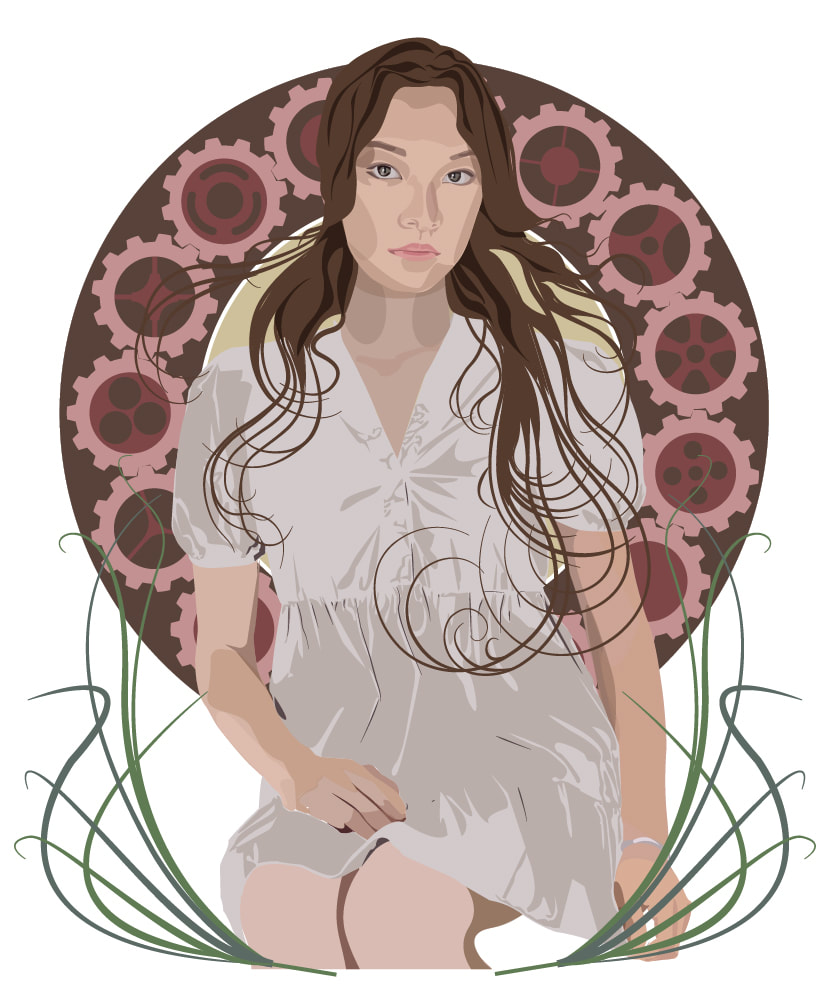
Use the pen tool of Adobe Illustrator to re-create a photographic portrait of a real hero or villain from the 20th or 21st century. Your drawing must include dramatic light and shadow.

Objectives:
  • Refine your technical skills with the DRAWING TOOLS of Adobe Illustrator
  •      Use LAYERS and SUBLAYERS to organize the parts of your work.
  •      Make CLOSED shapes.
  • Make LIGHT, MIDDLE, and DARK tonal values for every part.
  • Use CROPPING to improve visual impact.
  • Express emotional power through color choices.

First Steps:

1. Think about someone you think is a HERO.

2. Google IMAGE SEARCH that hero.

3. Collect 8 - 10 close-up photos of that person. The photos must have light and shadows on faces.
  • All Close-ups
  • All Straight-on view of face/head
  • All must have light and shadow on face
  • Collect the largest files you can find -- high resolution

4. Decide which photo is the best to create a poster of your hero.

5. Create new document in Adobe Illustrator:
  • Size: (18 inches high x 12 inches wide)
  • Orientation: Portrait (vertical)
  • Title: Hero yourlastname


Grading Criteria:
  • Expressiveness
  • Design (Visual Impact)
  • Technical Quality
  • Personal Investment

Tips:

  • Be precise
    • Create curving paths using the pen tool
 
  • Draw biggest shapes first,
    • then medium,
    • then smallest
 
  • Draw to group the large light areas,
    • then large middle areas,
    • then large dark areas
 
  • Must have layers in this order:
               Frame - a border of rectangle blocking the area outside the art board
                    (Lock this layer)
               (Other layers as necessary)
               Details
               Dark tones
               Middle tones
               Light tones
               (Background color)
               Photo (Lock this layer)

-------------

Chiaroscuro
(del italiano: chiaro, "luz" y scuro, "oscuro")
Técnica empleada para representar luces y sombras mientras definen objetos tridimensionales.

Pregunta esencial: ¿Cómo uso el chiaroscuro para crear forma, la ilusión de tres dimensiones en una superficie bidimensional?

Pregunta de contenido: ¿Qué hace a un héroe?

PROYECTO:
Utilice la herramienta de lápiz de Adobe Illustrator para recrear un retrato fotográfico de un héroe o villano real del siglo XX o XXI. Tu dibujo debe incluir luces y sombras dramáticas.


Objetivos:
  • Refina tus habilidades técnicas con las HERRAMIENTAS DE DIBUJO de Adobe Illustrator
    • Utilice CAPAS y SUBCAPAS (Layers y Sublayers) para organizar las partes de su trabajo.
    • Haz formas CERRADAS.
  • Crea valores tonales CLAROS, MEDIOS y OSCUROS para cada parte.
  • Expresa poder emocional a través de opciones de color.


Primeros pasos:

1. Piensa en alguien que crees que es un HÉROE.

2. BÚSQUEDA DE IMÁGENES en Google de ese héroe.

3. Reúna de 8 a 10 fotografías de primeros planos de esa persona. Las fotografías deben tener luces y sombras en los rostros.
  • Todos los primeros planos
  • Todo Vista directa de la cara/cabeza
  • Todos deben tener luces y sombras en la cara.
  • Recopile los archivos más grandes que pueda encontrar: alta resolución

4. Decide qué foto es la mejor para crear un póster de tu héroe.

5. Cree un nuevo documento en Adobe Illustrator:
  • Tamaño: (18 pulgadas de alto x 12 pulgadas de ancho)
  • Orientación: vertical (vertical)
  • Título: Héroe tu apellido


Criterio de evaluación:
  • Expresividad
  • Diseño (Impacto Visual)
  • Calidad Técnica
  • Inversión personal


Consejos:

Se preciso
Crea trazados curvos con la herramienta Pluma
 
Primero dibuja las formas más grandes,
luego medio,
luego el más pequeño
 
Dibuja para agrupar las grandes áreas claras,
luego grandes zonas medias,
luego grandes áreas oscuras
 
Debe tener capas en este orden:
               Marco: un borde de rectángulo que bloquea el área fuera del tablero de arte.
                    (Bloquea esta capa)
               (Otras capas según sea necesario)
               Detalles
               Tonos oscuros
               tonos medios
               Tonos claros
               (Color de fondo)
               Foto (Bloquear esta capa)

-------------


Checklist for Completion
​
  • In Illustrator, draw from a photograph of your hero, grouping light, middle, and dark tones.
    Save as: Hero Yourlastname.EPS
​
  • Transform the color scheme to create contrast, expressiveness, and visual impact:
    Lights: light, analogous warm colors and
    Shadows: cool, analogous dark colors that are complements of the light colors
    (Modify the color schemes as you see fit to improve design.)
    Save as: Hero Yourlastname COLOR.EPS
​
  • Word design: Three treatments (versions) of the type-based design extending from the bottom of the poster.
    Include:
         - One- or two-word attribute of the person
                    Examples: Courage; focus; fierce; pride; compassion; honor;
                                  humor; strength; intelligence; insight; commitment
                                  Hostility; rage; hatred; divisiveness; fear; mistrust
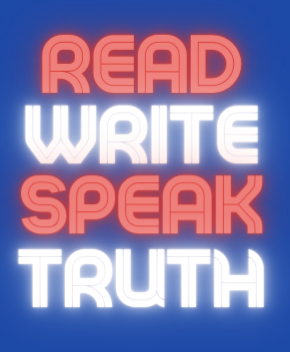
          Using the word(s) and simple design elements (lines, borders, simple shapes),
          create a text based design that: 
                    - Uses a bold, sans serif font
                    - Seems connected through color and style to your drawing
​                    - Conveys the appropriate mood/meaning

          Save as: Hero Yourlastname TYPE.EPS

  • Use the best word design (of the three versions) on the bottom of your artwork
 
  • ​Add Textures and Layer Styles in Photoshop
         
               Open "Hero Yourlastname type.EPS" in Photoshop
                    - 300 ppi, RGB Color Mode
                    - 18 inches high

               
Open JPGs of photographic textures in Photoshop

               Select All, Copy, and Paste Into shape selections of your Hero artwork.

               
Use Layer Styles on the word design and other 

               
Save as: Hero Yourlastname TEXTURE. PSD

  • Convert final image to TIF and JPG formats:
         - Hero Yourlastname TEXTURE. TIF (300 ppi, RGB, 18 in high)
         - Hero Yourlastname TEXTURE. JPG (72 ppi, RGB, 12 in high)
 
  • In a Google Doc, write a two- or three-sentence biography that gets to what makes this person a hero or villain. The full name of the person must be in the statement. Save as: Hero Yourlastname BIO

  • Create a folder in the Google Team Drive: “Hero YourLastName”. Turn in each of the files above into that folder.
 
  • ​Print the PSD file to the Epson Photo printer:
               Print to Fit Page: 18 inches high
               Paper: Ultra Premium Photo Paper Matte

----------------
​
GRADED ON
General Art Rubric
  • Completion - Show all work
    • All parts have been completed and turned in on time
    • Includes at least 3 variations of design of word
    • Printed and prepared for display
    • Written statement - biography
  • Personal Investment (25%)
    • Effective use of time - Productivity
    • Stays on task consistently throughout every period
    • Curiosity
    • Experimenting; Trying new things with artwork
  • Concept/Communication (25%)
    • Text and color scheme are appropriately expressive of whether this is a hero or villain.
    • Clarity of Well-written biography statement.
  • Design/ Artistic Concepts (25%)
    • Understanding of chiaroscuro - effectively separated into light, middle, and dark.
    • Use of warm and cool colors to create contrast
    • Use of analogous and complementary color relationships
    • Overall visual impact
  • Technical Quality (25%)
          Skillful use the following:
  • Pen tool
    • Finely drawn
    • Skillful differentiation of lights, middles, and darks
  • Layers and Color Modes of those layers
  • Textures
    • Add richness to image
    • Don’t interfere with the quality of lights, middle, and dark shapes - Not distracting
  • Layer Effects on Type
    • Drop shadows, bevels, emboss, glows, etc.


0 Comments

Road Signs

10/18/2023

0 Comments

 
Project Description:
In pencil, on the Road Signs worksheet (handout), work out ideas for road signs that clearly, immediately communicate the subject indicated under each diamond. Use about an equal amount of black and white. Since a viewer would be seeing and "reading" these signs at a distance and at 40 mph, you will have to design them to be bold, grab the viewer's attention, and make sense immediately (Thin lines and little details won't work.). Ink this with black ink. Craftsmanship/presentation counts.

Here's the worksheet/template:

https://drive.google.com/file/d/1THcfbI6OhHAUzvN5xA5o4slB3z3JVkzS/view?usp=sharing

​Subjects that you will graphically depict for immediate understanding:
  • Sky Falling
  • Chess Area
  • Kite Flying Area
  • Ant Farm
  • Fortune Teller
  • Nuclear Power Plant
  • Baseball Field
  • Alien Crossing
  • Earthquake / Fault Line
  • Target Range
  • Botanical Gardens
  • Paratrooper Landing

Objectives:
  • Apply an understanding of negative and positive spaces.
  • Get to the point, visually, with "economy of means."
  • Refine your craftsmanship through control and precision with tools & materials.

Materials:
  • Worksheet
  • Pencil
  • Eraser
  • Black Sharpie markers (fine, ultrafine)

Grading Criteria:
  • Clarity of Each Concept
  • Design - Visual Impact
  • Craftsmanship

To Start:
Draft your ideas on scrap paper first

Helpful Resources:
This lesson is taken from Visual Literacy: A Conceptual Approach to Graphic Problem Solving, by Judith Wilde and Richard Wilde. It is available for viewing in Room 409. You can find more examples of solutions in the book.

Student Exemplars
Click the link below for examples from Burlington High School students: 

Road Signs Gallery

Self Critique Questions
Ask yourself these questions for each of your final executions:
  • Is the subject clear?
  • It is visually unique and interesting? Does it have visual impact?
  • Is the design technically well-executed? Is it professional-looking? 
  • Does the design contain heavy blacks?
  • Are the important elements emphasized and easy-to-see and understand?
0 Comments

Drawing with the Shape Tools

9/25/2023

0 Comments

 
Symmetrical Design with Pattern

Due Date:
Three days

Project:
Using the shape tools of Adobe Illustrator, create a square, symmetrical design with repeated elements. The design should be unified in its color scheme, having at least 10 colors and 2-3 dominant colors.

Parameters:
     Square: 8" x 8"

     Color Mode: CMYK (Cyan, Magenta, Yellow, and BlacK)
     File format: Illustrator EPS
     Save As: "symmetry yourlastname.eps"
     At least 10 colors
     2 - 3 dominant colors
​     Flat colors (No gradients)

Objectives:
  • Develop skills with tools and techniques of Illustrator
  • Work over a grid
  • Create a variety of shapes
  • Align shapes and other elements
  • Group paths into objects
  • Divide shapes using the Pathfinder tool
  • Use layer sets 
  • Create strong visual impact
  • Create an orderly and professional-looking design

Materials:
Adobe Illustrator

Grading Criteria:
  • Design (Visual Impact)
  • Technical Quality
  • Personal Investment
  • Studio Habits of Mind (rubric)

To Start:
1. Create a New Document
        File -- New Document
        Size: 8 in x 8 in
2. Create guidelines halfway across and halfway up your document
        Go to View -- Show Rulers
        Drag guidelines from rulers to your central axes of the document
3. Create a rectangular grid to act as a guide or template on which to organize your shapes (You can find the rectangular grid tool under the same toolbox button as the line segment tool.).


---------------------------------------------------------


​
Proyecto: 
Utilizando las herramientas de Forma de Adobe Illustrator, cree un diseño cuadrado y simétrico con elementos repetidos. El diseño debe estar unificado en su combinación de colores, teniendo al menos 10 colores y 2-3 colores dominantes. 

Parámetros: 
  • Cuadrado: 8" x 8" 
  • Modo de color: CMYK (cian, magenta, amarillo y negro) 
  • Formato de archivo: Illustrator EPS 
  • Guardar como: "symmetry tuapellido.eps" 
  • Al menos 10 colores 
  • 2 - 3 colores dominantes 
  • Colores planos (sin degradados) 


Objetivos: 
  • Desarrollar habilidades con herramientas y técnicas de Illustrator. 
  • Trabajar sobre una cuadrícula 
  • Crea una variedad de formas. 
  • Alinear formas y otros elementos. 
  • Agrupar rutas en objetos 
  • Dividir formas usando la herramienta Buscatrazos (Pathfinder) 
  • Utilice "conjuntos" de capas 
  • Bloquear formas 
  • Crea un fuerte impacto visual 
  • Crea un diseño ordenado y de aspecto profesional. 


Materiales: 
Ilustrador Adobe 


Criterio de evaluación: 
  • Diseño (Impacto Visual) 
  • Calidad Técnica 
  • Inversión personal 
  • Studio Habits of Mind (rúbrica de calificaciones)


Para comenzar: 

 1. Crea un nuevo documento 
  • Archivo - Nuevo documento
  • Tamaño: 8 x 8 pulgadas 


 2. Cree pautas a mitad y mitad de su documento. Ir a Ver - Mostrar reglas Arrastre las pautas de las reglas a los ejes centrales del documento. 

3. Cree una cuadrícula rectangular que actúe como guía o plantilla sobre la cual organizar sus formas (puede encontrar la herramienta de cuadrícula rectangular en el mismo botón de la caja de herramientas que la herramienta de segmento de línea).
  
0 Comments

Pre-Assessment: Folder Design: Name and Quote/Phrase/Slogan

8/30/2023

0 Comments

 
Assignment:
Create a strong design that uses both your full name and a quote, phrase, or slogan that tells us something about you. Apply all your knowledge about good design to make the artwork as dynamic and visually interesting as possible. Do your best to make this a thoughtful and careful finished artwork.

Focus on the following:
  • Interesting Lettering
  • Break up the entire picture plane (Design fills the page.)
  • Decorative/Ornamental/Visually exciting (Pattern?)
  • High Contrast - Approx. equal amounts dark and light
  • Consider the best approach/process

Tip: Draw multiple thumbnail sketches to test out different designs.

Project Length: Four days
Size: 8 ½ x 11”
Media: Black ink (Sharpies and felt tip pens)

Process:
  1. Decide on slogan or quote.
  2. Make at least 4 thumbnail sketches
  3. Then develop one of those sketches into an actual-sized rough draft before transferring and refining an inked showpiece on tagboard.

Grading Criteria
  • Creativity
  • Design (Visual Impact, Effective Use of Elements and Principles of Art)
  • Technical Quality (“Finished”)
  • Studio Work Habits

This is a pre-assessment to find out what you already know, and I will be observing and taking notes on your work habits and your process, your final work, and your participation in the final critique of student work. By jotting down brief notes on how each of you approaches the project, I will gain a better sense of your strengths and of how you could grow throughout the year.

As the measuring tool, I will be using this rubric:
​
Rubric: Art Studio Habits of Mind

---------------------------

​
Proyecto: 
Crea un diseño sólido que utilice tanto tu nombre completo como una cita, frase o eslogan que exprese algo sobre ti. Aplica todos tus conocimientos sobre buen diseño para que la obra de arte sea lo más dinámica y visualmente interesante posible. Haga todo lo posible para que esta sea una obra de arte con un acabado cuidadoso y reflexivo. 

Debe: 
  • Debes incluir tu nombre completo.
  • Debes incluir una frase que exprese quién eres.
  • Debes llenar el plano de la imagen.
  • Debes diseñar letras interesantes y artísticas.
  • Debes usar patrón -  decorativo/ornamental
  • Alto contraste - cantidades iguales de blanco y negro (½ y ½)
Vencimiento: 4 - 5 días
Tamaño: 8 ½ x 11”
Medios: tinta negra (marcadores negros) 


Proceso: 
1. Decide el eslogan o la cita. 
2. Dibuja al menos 3 bocetos en miniatura para probar diferentes diseños. 
3. Desarrolla tu mejor boceto hasta convertirlo en un borrador de tamaño completo. 
4. Transfiera el borrador a la carpeta. 
5. Entinte limpia y cuidadosamente el diseño de su carpeta para que sea 1/2 negro y 1/2 blanco. 


Criterio de evaluación 
  • Creatividad 
  • Diseño (Impacto Visual) 
  • Calidad Técnica (¿Se ve “terminado”)? 
  • Hábitos de trabajo en el estudio 
Rúbrica de calificación: hábitos mentales de estudio


Objetivo: 
Esta es una evaluación previa para descubrir lo que ya sabe y es capaz de hacer. Estaré observando tus hábitos de trabajo y tu proceso, tu trabajo final y tu participación en la crítica final del trabajo estudiantil. Obtendré una idea de tus puntos fuertes y de cómo podrías crecer a lo largo del año.


0 Comments

Theatrical Poster and Playbill Cover

3/2/2023

0 Comments

 
Project: 
Create the promotional graphics for a theater production: The Addams Family: School Edition

Objectives:
  • Improve your skills with basic Illustrator tools, particularly the pen tool
  • Apply the principles of contrast, repetition, alignment and proximity
  • Communicate an idea through selection of appropriately expressive type.
  • Create a visual personality through the title art and other elements
  • Work to fulfill a client's wishes, while maintaining your own artistic integrity

Materials:
Adobe Illustrator

Parameters:
  • Created in: Adobe Illustrator
  • The Music Dept needs a poster/ sign, playbill cover, and t-shirt logo.
  • The playbill is 5.5 inches wide x 8.5 inches high;
  • The design needs to bleed off the page.
  • File name: “musical 2023 yourlastname playbill.eps”
  • The signs are 4 x 8 feet, 2 x 4 feet and 3 x 4 feet.
    • Billboard: 4 x 8’ (48 x 96”): “musical 2023 yourlastname billboard.eps”
    • Sandwich board: 2 x 4’ (24 x 48”): “musical 2023 yourlastname sandwich .eps” ​
  • File format: EPS or high resolution PDF
  • The playbill cover can be full color.
  • Work in silhouette or other vector graphics
  • NO photographs, clip art, or "borrowing" from famous images of the movie or musical
  • Shoot your own photographs from student models, and use those as a drawing reference.

You should relay the following information to your viewers:

Text ("Copy"):

(For the playbill:) 
Dimensions: 5.5 inches wide x 8.5 inches high (vertical)

      Burlington High School Presents:

      The ADDAMS FAMILY
      School Edition

      April 29 - May 7, 2023
      A Performing Arts Department Production

------------

(For the poster and signs) 
Dimensions: 4' x 8' for fence;  2 x 4' for sandwich boards, vertical)


        Burlington High School Presents: (20% font size compared to title at 100%)

        The ADDAMS FAMILY
        School Edition
       
A Performing Arts Department Production

        Dates and Start Time (20% as big as the title)
     
  April 29 - May 7, 2023
   

         BurlingtonTheatre.com (80% as big as the title)
         781-A-FUN-TIC (60% as big as the title)
        $10 for students and seniors
        $15 for adults


Grading Criteria:
  • Personal Investment (Work Habits, Ambition)
  • Design / Visual Impact
  • Inventiveness / Creativity
  • Expressiveness / Communication
  • Technical Quality / Craftsmanship

Resources:
In preparation for your own theatrical poster designs, here's a link to 50 great movie poster designs.
http://www.smashingmagazine.com/2008/10/12/50-beautiful-movie-posters/

To Start:
  1. Collect images of effective promotional graphics for movies and plays. Ask yourself: what makes them work so well?
  2. Collect information and visual references that relate to the subject(s) of the play.
  3. Thumbnails and rough drafts (especially of figures. What poses will you need?)
  4. Take photos of student models to use as visual reference for your drawings. The silhouettes should be clear, informative and expressive. Exaggerate the poses.

Helpful Resources:
Movie posters may prove inspirational. There are two books of movie posters (of movies from the 1960s and 1970s) in Mr. Ratkevich's Portfolio classroom, Room 215.

Self Critique Questions
Ask yourself these questions for each of your final executions:
  • Is the concept clear?
  • It is visually unique and interesting? Does it have visual impact?
0 Comments

Propaganda Poster "Spoof": Art & Design Promotion

12/5/2022

0 Comments

 
Picture
Shepard Fairey
​Chiaroscuro
(from Italian: chiaro, “light,” and scuro, “dark”)
A technique employed to represent light and shadow as they define three-dimensional objects.


Essential Question:
How do I use to create , the illusion of three dimensions on a two dimensional surface?


PROJECT:
Using digital photography and the pen tool of Adobe Illustrator, re-imagine a famous propaganda poster to promote the BHS Art & Design program. 

To do this, you will first combine: 
  • The composition from a famous historical propaganda poster
  • A photograph of yourself or a friend /peer in the same pose as from the historical propaganda poster.
  • A photographic close-up (from the same angle as in the original propaganda poster) of a real hero or celebrity from the 20th or 21st century (Someone EVERYONE will recognize in a positive light.). 

The photograph you take, and your final drawing must include dramatic light and shadow to create a sense of three-dimensional form (chiaroscuro)


Media:
  • Digital Photography (to take photos of yourself/friends)
  • Photoshop (for combining photos and photo-editing)
  • Adobe Illustrator (for drawing)
  • Photoshop again (for textures and effects)


Objectives:
  • Use Photoshop to cleanly and convincingly COMBINE PHOTOGRAPHS.
  • Refine your technical skills with the DRAWING TOOLS of Adobe Illustrator.
  • Use LAYERS and SUBLAYERS to organize the parts of your work.
  • Make CLOSED shapes.
  • Make LIGHT, MIDDLE, and DARK tonal values for every part to create three-dimensionality.

Specifications:
  • Proportions will be the same as the original propaganda poster you are spoofing, but the maximum dimensions should not exceed 12 x 18"
  • File name: propaganda yourlastname
  • Begin in Photoshop to collage your images, then trace in Illustrator, then add textures and effects in Photoshop.

Grading Criteria:
CONCEPT:
  • Inventiveness
  • Clear Communication of Message
DESIGN:
  • Image has Visual Impact
  • Effective Color Combinations
CRAFTSMANSHIP / TECHNICAL QUALITY
  • Skillful use of pen and other tools of Illustrator
  • Three-dimensionality using Chiaroscuro
  • Shadows are consistent
  • Proper formatting: Layers, Sublayers, Labeled Paths
  • Inventive Experimentation with Technique
  • Refinement using Photoshop and Illustrator
WORK HABITS / PERSONAL INVESTMENT
  • Studio Habits of Mind


Tips:

Be precise.
               Create curving paths using the pen tool.

Draw the biggest shapes first,
               then medium,
               then smallest 

Draw to group the large light areas,,
               then large middle areas,
               then large dark areas 

Should have layers in this order: 
  • Details
  • Dark tones
  • Middle tones
  • Light tones
  • (Background color)
  • Photo (Lock this layer)

​
Steps:

1. View/study the propaganda posters from the links below.
  • https://www.canva.com/learn/examples-of-propaganda/
  • https://stacker.com/history/famous-propaganda-posters-last-100-years

2. Brainstorm fun and interesting ideas for a "spoof" of one of the posters.

3. Enlist your model(s) (You may be your own model.) to pose.

4. Take a series of good, sharp, well-lit photos of action shots of your model posing. Consider your point of view and your lighting; these should be similar to the original poster.

5. Find a photo of a hero or celebrity seen from an angle (and with similar lighting) to the original poster and your own photograph.

6. Using Photoshop, combine your photo and the photo of the celebrity.

7. Save your photo-collaged image as a TIF and open it in Illustrator.

8. Resize your image as big as you can to fit within a 12 x 18" document. Lock in place.

9. Create a series of layers, in this order:
  • Details
  • Dark tones
  • Middle tones
  • Light tones
  • (Background color)
  • Photo (Lock this layer)

10. Using the pen tool of Illustrator to create curved paths, trace your image using the pen tool.

11. Be sure to use the layers and sublayers, and label paths, to keep your file organized and to help work more efficiently.

12. Add text similar in size and style to the original poster.

13. When your drawing is complete and full-color, save as EPS.
​
14. Open in Photoshop. Use "paste into" to add textures. Use layer styles and effects.


​Below is a student artwork created in Illustrator that shows the STYLE in which this will be done:
Picture
Anna Perl
The student work below shows chiaroscuro AND the additions of textures and effects to portraiture.
0 Comments

Read Write Speak Truth  - Typographic Designs - Poster Series

11/9/2022

0 Comments

 
Picture
The English Department will be hanging posters sharing their unofficial department motto, "Read. Write. Speak. Truth." It's from a Clint Smith TED Talk that was shared with all freshmen.

Design a series of posters of the phrase in the different languages that our students speak. They can each reflect a different culture (of that language spoken) — integrating different cultural art and style components.

At least 4 final designs (each for a different language)
(You may have multiple treatments for the different languages.)

Distance of text from left and right borders must be equal.

Setting Up Document:
  • Letter Size (8.5 x 11"), Portrait orientation
  • Start with four art boards in a single Adobe Illustrator document.
  • Margins/borders for text should be at least 1/2" on all 4 edges, and should be consistent on left and right.
  • Start with four art boards in your document (You may add more if needed.)

Objectives:
Alignment and Spacing
  • Adjust Kerning, Tracking, and Leading
  • MUST be Justified (Aligned on both left and right margin edges.)
  • Equal spacing from left and right edges of document
Reflect home region/culture through COLOR and STYLE

Tips:
  • Multiple treatments of each language
  • Test out swatches of colors side-by-side

Graded on:
Studio Habits of Mind
0 Comments

Program of Studies Cover

10/31/2022

0 Comments

 
Project:
Using Adobe Illustrator, design a book cover for the Burlington High Program of Studies.
  • Use type and shape to create visual impact and express an overall sense of academics and pride.
  • It may include the school seal, and incorporate a list of all courses.
  • Use simple shapes as design elements.
  • Must include "Burlington High School"
  • Must include "Program of Studies"
  • Must include "2023-2024"
  • May include a list of all courses
  • May include the school seal (EPS)

Objectives:
  • Gain skill with the Type tools of Adobe Illustrator
  • Apply your understanding of the principles of good graphic design:
               Contrast
               Balance
               Repetition
               Alignment
               Proximity
  • Communicate an idea through selection of appropriately expressive type.
  • Arrange elements to maximize visual impact

Materials:
  • Adobe Illustrator

Requirements for Format:
  • File Format: Illustrator EPS
  • Size: Letter (8.5 x 11")
  • Orientation: Vertical (portrait)
  • Color Mode: RGB
  • Bleed to edge (no white border)
  • May be created in any combination of red, black, and/or white
  • NO CLIP ART may be used
  • No copyrighted imagery may be used
  • Convert all text to outline (Keep a copy with all type.)
  • Save as: "programofstudies yourlastname.eps", in EPS format
  • Submit as EPS, PDF, TIF, and JPG (5 MB)

(See the instructor for an editable EPS of the school seal. You can check the online Program of Studies for a list of all courses.)

Grading Criteria:
  • CONCEPT
  •      Looks academic
  •      Inventiveness
  • DESIGN
  •      Well-Chosen Typeface(s)
  •      Image has Visual Impact
  •      Considers contrast, repetition, alignment, proximity, balance
  • CRAFTSMANSHIP
  •      Skillful use of tools of Illustrator
  • WORK HABITS / PERSONAL INVESTMENT


Tips to Get Started:

Consider what would be both appropriate and special for an academic publication.

Ask yourself how you can make students excited to get their hands on one of these publications? How can you use simple shape and text to energize the design?


Helpful Resources:

There are a number of Graphic Design books and magazines in Room 215. Use them for inspiration and tutorials.
0 Comments

Stock Photo Sites

10/21/2022

0 Comments

 
Free Stock Photo Sites:
Search library of images, click image, click free download button.
Multiple sizes available. Download the largest file.


https://unsplash.com/

https://www.pexels.com/

https://pixabay.com/ 
0 Comments

Seasonal Display for Burlington Sculpture Park: The Village

9/30/2022

0 Comments

 
Project:
On a tall vertical art board in Illustrator (18 inches high x 12 inches wide), draw the facade of a house or another building you might see in a village. Set it in a winter environment, and leave room for a quote near the top of the picture plane.

The intention is that the designs will be enlarged to vertical (3 foot x 1.5 foot, or larger) banners to stand up as outdoor displays. Ideally, weatherproof vinyl mesh banners would be affixed to pole brackets in the Burlington Sculpture Park and would be on display during December and early January.

For alternative version of this project, click HERE.

Student Examples


Parameters:
Limited Color Palette: So that the various banners are unified as a set, use white, blues, silver (grays), and gold/copper. You may use a minimal amount of one other hue (such as violet) as an accent.

Using photographic references, draw the design in Adobe Illustrator, then use Photoshop (300 ppi) to add painterly effects, lighting effects, and textures.


You may incorporate your designs or patterns from one or more of any of your previous digital art work into this new design.

Objectives:
  • Create a positive mood/atmosphere.
  • Apply skills with tools and techniques of Illustrator and Photoshop together
  • Create strong visual impact
  • Work with others to create a series of designs that work together stylistically and in their color schemes.

Materials:
  • FIRST, Adobe Illustrator for drawing
  • THEN (possibly, depending on time), Adobe Photoshop for painterly effects, lighting effects, and textures
  • FINALLY, Adobe Illustrator for typography


Grading Criteria:
  • Design (Visual Impact)
  • Technical Quality
  • Personal Investment


To Start:

1. Study photos of homes and villages. Your drawing will be a straight-on view of the front of the building.

2. On paper, draw to develop your design. Create at least a few thumbnail sketches and some color studies using color pencil. In designing, consider the relationship of positive and negative space, visual movement, and other principles of art to create a strong composition.
You may use the this worksheet for a larger drawing or this thumbnail sketch worksheet.

3. In Illustrator:
Create a New Document
        File -- New Document
        Size: 12 inches wide x 18 inches high
        Orientation: Portrait
Use the pen tool to draw, based on your best sketch. You may even scan or photograph your pencil sketch, and trace over it using the pen tool in Illustrator.

4. Open the EPS in Photoshop. When the dialogue box comes up, be sure to change the resolution to 300 ppi and the color mode to RGB. The size should be at least 12 x 18".
Add painterly effects, layer styles, lighting effects, and textures.
Flatten and save as a TIFF.

5. Back in Illustrator, use the Character and Type palettes to incorporate
 quotes about peace, love, and community into your design, integrating words and image.

Save as EPS, TIF, and JPG files: "winter yourlastname.eps", etc.
0 Comments
<<Previous

    Mr. Ratkevich

    781.273.7024
    [email protected]
    ​

    Archives

    November 2023
    October 2023
    September 2023
    August 2023
    March 2023
    December 2022
    November 2022
    October 2022
    September 2022
    June 2022
    May 2022
    January 2022
    December 2021
    September 2021
    May 2021
    March 2021
    February 2021
    January 2021
    December 2020
    November 2020
    October 2020
    September 2020
    February 2020
    October 2019
    August 2019
    June 2019
    May 2019
    April 2019
    February 2019
    January 2019
    October 2018
    September 2018
    May 2018
    January 2018
    December 2017
    November 2017
    June 2017
    May 2017
    April 2017
    January 2017
    October 2016
    April 2016
    January 2016
    December 2015
    October 2015

    Categories

    All

    RSS Feed

Powered by Create your own unique website with customizable templates.