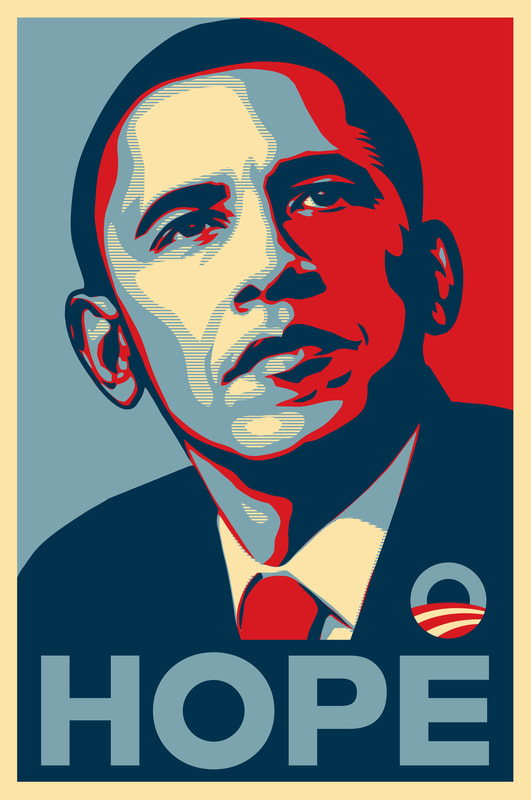
Shepard Fairey
Chiaroscuro
(from Italian: chiaro, “light,” and scuro, “dark”)
A technique employed to represent light and shadow as they define three-dimensional objects.
Essential Question:
How do I use to create , the illusion of three dimensions on a two dimensional surface?
PROJECT:
Using digital photography and the pen tool of Adobe Illustrator, re-imagine a famous propaganda poster to promote the BHS Art & Design program.
To do this, you will first combine:
The photograph you take, and your final drawing must include dramatic light and shadow to create a sense of three-dimensional form (chiaroscuro)
Media:
Objectives:
Specifications:
Grading Criteria:
CONCEPT:
Tips:
Be precise.
Create curving paths using the pen tool.
Draw the biggest shapes first,
then medium,
then smallest
Draw to group the large light areas,,
then large middle areas,
then large dark areas
Should have layers in this order:
Steps:
1. View/study the propaganda posters from the links below.
2. Brainstorm fun and interesting ideas for a "spoof" of one of the posters.
3. Enlist your model(s) (You may be your own model.) to pose.
4. Take a series of good, sharp, well-lit photos of action shots of your model posing. Consider your point of view and your lighting; these should be similar to the original poster.
5. Find a photo of a hero or celebrity seen from an angle (and with similar lighting) to the original poster and your own photograph.
6. Using Photoshop, combine your photo and the photo of the celebrity.
7. Save your photo-collaged image as a TIF and open it in Illustrator.
8. Resize your image as big as you can to fit within a 12 x 18" document. Lock in place.
9. Create a series of layers, in this order:
10. Using the pen tool of Illustrator to create curved paths, trace your image using the pen tool.
11. Be sure to use the layers and sublayers, and label paths, to keep your file organized and to help work more efficiently.
12. Add text similar in size and style to the original poster.
13. When your drawing is complete and full-color, save as EPS.
14. Open in Photoshop. Use "paste into" to add textures. Use layer styles and effects.
Below is a student artwork created in Illustrator that shows the STYLE in which this will be done:
(from Italian: chiaro, “light,” and scuro, “dark”)
A technique employed to represent light and shadow as they define three-dimensional objects.
Essential Question:
How do I use to create , the illusion of three dimensions on a two dimensional surface?
PROJECT:
Using digital photography and the pen tool of Adobe Illustrator, re-imagine a famous propaganda poster to promote the BHS Art & Design program.
To do this, you will first combine:
- The composition from a famous historical propaganda poster
- A photograph of yourself or a friend /peer in the same pose as from the historical propaganda poster.
- A photographic close-up (from the same angle as in the original propaganda poster) of a real hero or celebrity from the 20th or 21st century (Someone EVERYONE will recognize in a positive light.).
The photograph you take, and your final drawing must include dramatic light and shadow to create a sense of three-dimensional form (chiaroscuro)
Media:
- Digital Photography (to take photos of yourself/friends)
- Photoshop (for combining photos and photo-editing)
- Adobe Illustrator (for drawing)
- Photoshop again (for textures and effects)
Objectives:
- Use Photoshop to cleanly and convincingly COMBINE PHOTOGRAPHS.
- Refine your technical skills with the DRAWING TOOLS of Adobe Illustrator.
- Use LAYERS and SUBLAYERS to organize the parts of your work.
- Make CLOSED shapes.
- Make LIGHT, MIDDLE, and DARK tonal values for every part to create three-dimensionality.
Specifications:
- Proportions will be the same as the original propaganda poster you are spoofing, but the maximum dimensions should not exceed 12 x 18"
- File name: propaganda yourlastname
- Begin in Photoshop to collage your images, then trace in Illustrator, then add textures and effects in Photoshop.
Grading Criteria:
CONCEPT:
- Inventiveness
- Clear Communication of Message
- Image has Visual Impact
- Effective Color Combinations
- Skillful use of pen and other tools of Illustrator
- Three-dimensionality using Chiaroscuro
- Shadows are consistent
- Proper formatting: Layers, Sublayers, Labeled Paths
- Inventive Experimentation with Technique
- Refinement using Photoshop and Illustrator
Tips:
Be precise.
Create curving paths using the pen tool.
Draw the biggest shapes first,
then medium,
then smallest
Draw to group the large light areas,,
then large middle areas,
then large dark areas
Should have layers in this order:
- Details
- Dark tones
- Middle tones
- Light tones
- (Background color)
- Photo (Lock this layer)
Steps:
1. View/study the propaganda posters from the links below.
- https://www.canva.com/learn/examples-of-propaganda/
- https://stacker.com/history/famous-propaganda-posters-last-100-years
2. Brainstorm fun and interesting ideas for a "spoof" of one of the posters.
3. Enlist your model(s) (You may be your own model.) to pose.
4. Take a series of good, sharp, well-lit photos of action shots of your model posing. Consider your point of view and your lighting; these should be similar to the original poster.
5. Find a photo of a hero or celebrity seen from an angle (and with similar lighting) to the original poster and your own photograph.
6. Using Photoshop, combine your photo and the photo of the celebrity.
7. Save your photo-collaged image as a TIF and open it in Illustrator.
8. Resize your image as big as you can to fit within a 12 x 18" document. Lock in place.
9. Create a series of layers, in this order:
- Details
- Dark tones
- Middle tones
- Light tones
- (Background color)
- Photo (Lock this layer)
10. Using the pen tool of Illustrator to create curved paths, trace your image using the pen tool.
11. Be sure to use the layers and sublayers, and label paths, to keep your file organized and to help work more efficiently.
12. Add text similar in size and style to the original poster.
13. When your drawing is complete and full-color, save as EPS.
14. Open in Photoshop. Use "paste into" to add textures. Use layer styles and effects.
Below is a student artwork created in Illustrator that shows the STYLE in which this will be done:
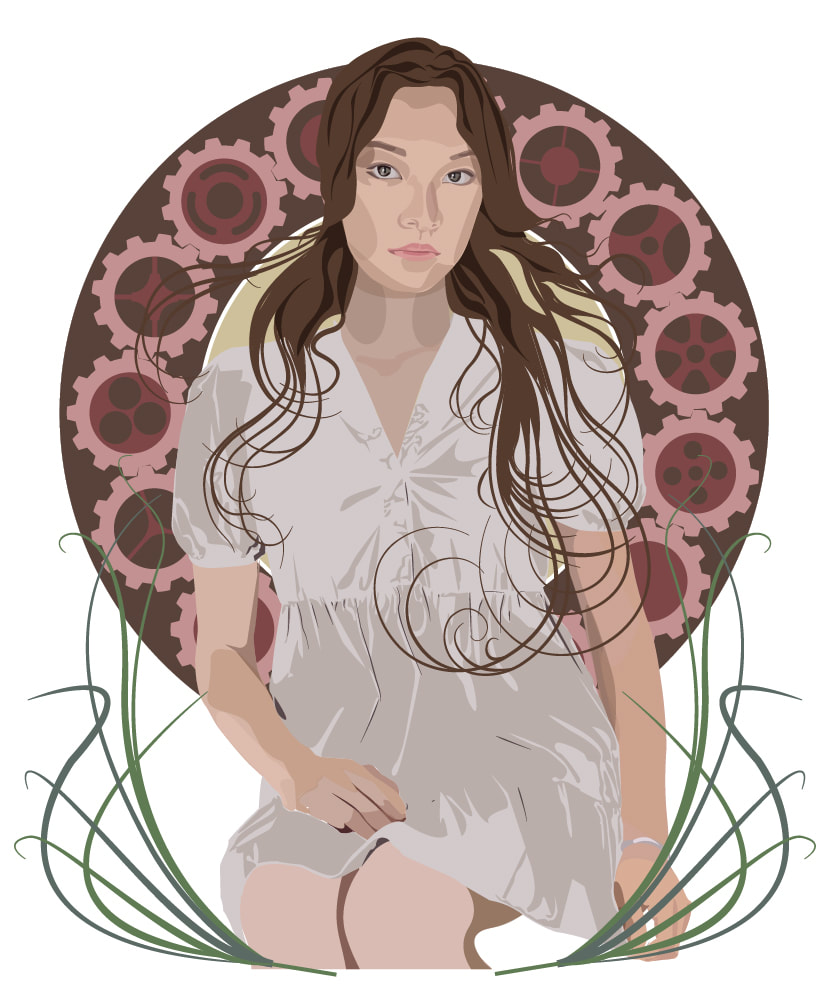
Anna Perl
The student work below shows chiaroscuro AND the additions of textures and effects to portraiture.
 RSS Feed
